Построение критического пути (critical path)
The critical path helps you determine the essential tasks that need to be completed on your project to meet your end goal and how long each task will take. The critical path also provides a quick reference for critical tasks by revealing which tasks will impact your project completion date negatively if their scheduled finish dates are late or missed. A critical path can help you define the resources you need, your project baselines, and any flexibility you have in the schedule.
How to create a critical path
Step 1: Capture all tasks
The main goal in this step is to make sure that you aren’t missing a key piece of work that is required to complete your project. When creating a critical path, focus on the essential, “need to do” tasks, rather than the “nice to do” tasks that aren’t essential for the completion of the project. Here is an example of critical tasks for building the structure of a house:
| Task |
|---|
| A) Excavation |
| B) Foundation |
| C) Framing |
| D) Roof |
| E) Plumbing |
| F) Heating, ventilation, and air conditioning (HVAC) |
| G) Electrical |
| H) Insulation |
| I) Drywall + Paint |
| J) Flooring |
Step 2: Set dependencies
To figure out dependencies for each task, ask:
-
Which task needs to take place before this task?
-
Which task can be finished at the same time as this task?
-
Which task needs to happen right after this task?
Once you have answered these questions, you can list these dependencies next to your list of tasks:
| Task | Dependency |
|---|---|
| A) Excavation | |
| B) Foundation | A) Excavation |
| C) Framing | B) Foundation |
| D) Roof | C) Framing |
| E) Plumbing | C) Framing |
| F) HVAC | C) Framing |
| G) Electrical | C) Framing |
| H) Insulation | E) Plumbing, F) HVAC, G) Electrical |
| I) Drywall + Paint | H) Insulation |
| J) Flooring | I) Drywall + Paint |
Step 3: Create a network diagram
One common way to visualize the critical path is by creating a network diagram. Network diagrams, like the example below, sequence tasks in the order in which they need to be completed, based on their dependencies. These diagrams help visualize:
-
The path of the work from the start of the project (excavation) to the end of the project (flooring)
-
Which tasks can be performed in parallel (e.g., HVAC and plumbing) and in sequence (e.g., plumbing then insulation)
-
Which non-essential tasks are NOT on the critical path
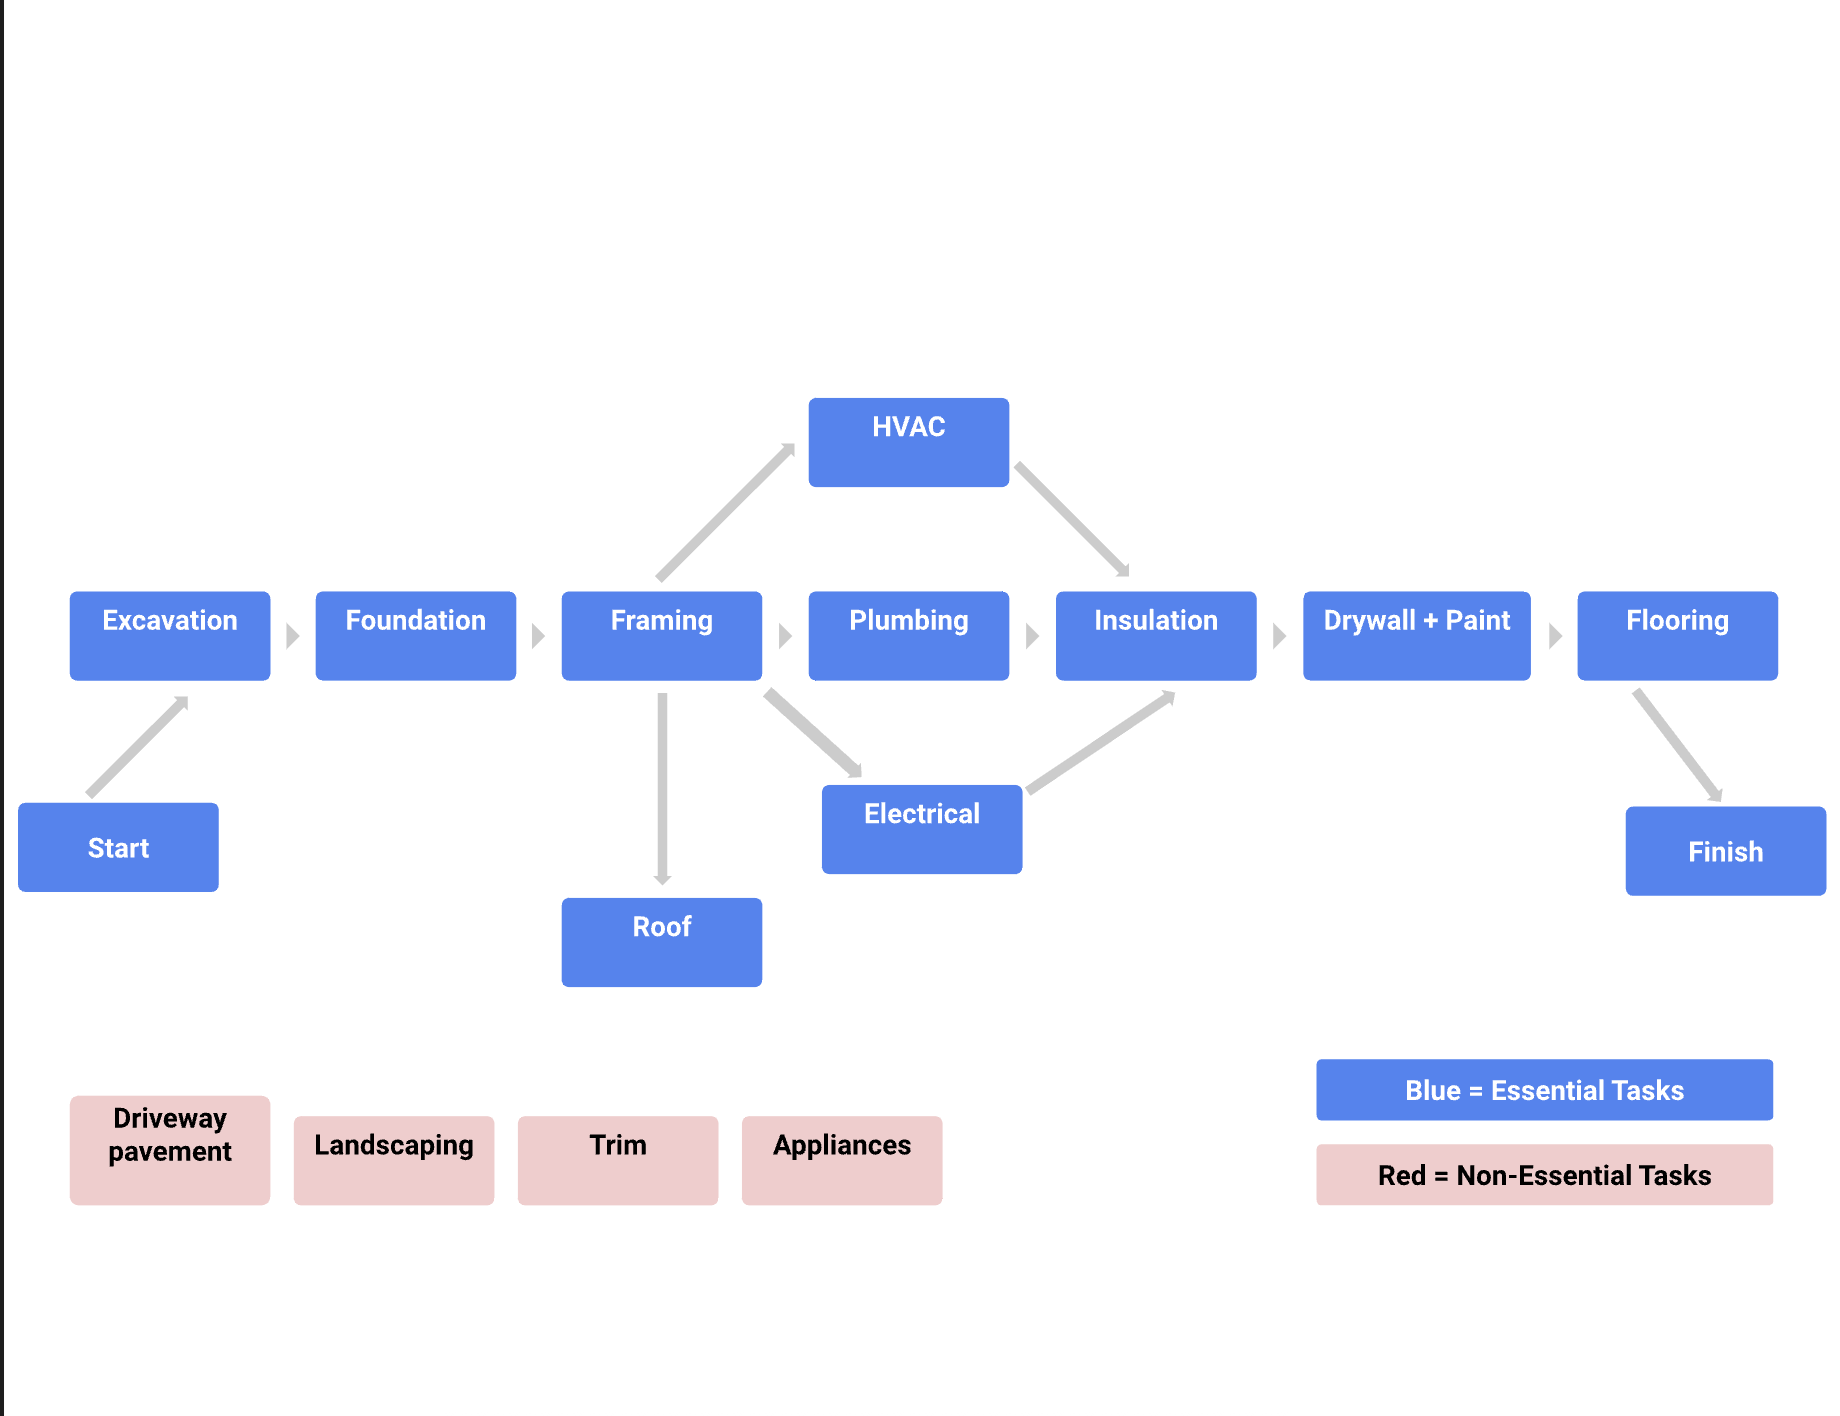
(Long description of graphic above: Essential tasks, including Start, Excavation, Foundation, Framing, Roof, HVAC, Plumbing, Electrical, Insulation, Drywall+Paint, Flooring, and Finish, are laid out in a sequential path and highlighted in blue. Roof, HVAC, and Electrical are shown as tasks able to be done concurrently with Framing and Plumbing. Non-essential tasks are separated from essential tasks and are highlighted in red. Non-essential tasks include Driveway Pavement, Landscaping, Trim, and Appliances.)
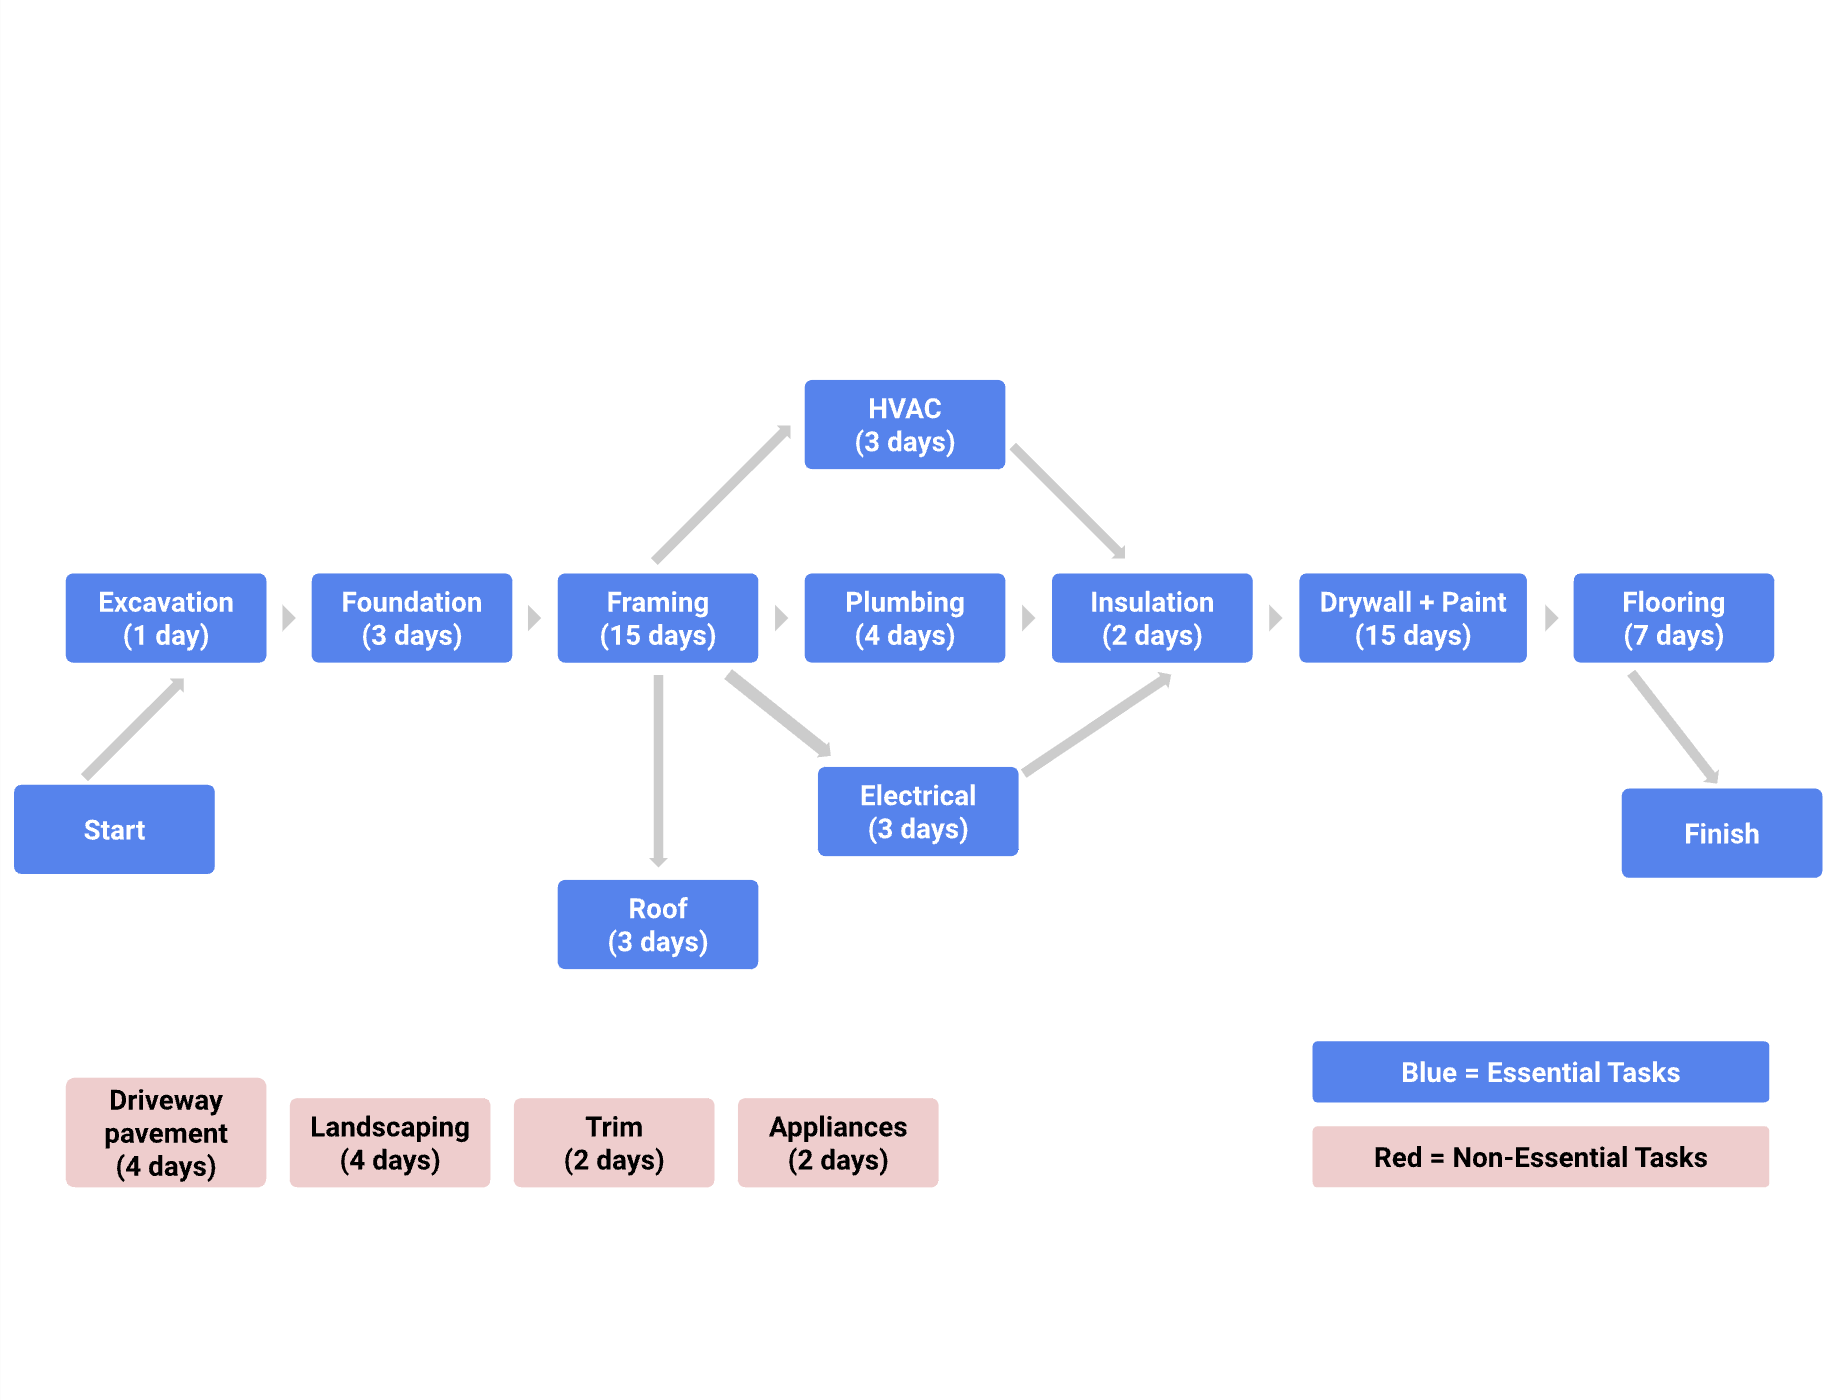
Step 4: Make time estimates
After determining tasks and dependencies, consult key stakeholders to get accurate time estimates for each task. This is a crucial step in determining your critical path. If your time estimates are significantly off, it may cause the length of your critical path to change. Time estimates can be reviewed and updated throughout the project, as necessary.
| Task | Duration | Dependency |
|---|---|---|
| A) Excavation | 1 Day | |
| B) Foundation | 3 Days | A) Excavation |
| C) Framing | 15 Days | B) Foundation |
| D) Roof | 3 Days | C) Framing |
| E) Plumbing | 4 Days | C) Framing |
| F) HVAC | 3 Days | C) Framing |
| G) Electrical | 3 Days | C) Framing |
| H) Insulation | 2 Days | E) Plumbing, F) HVAC, G) Electrical |
| I) Drywall + Paint | 15 Days | H) Insulation |
| J) Flooring | 7 Days | I) Drywall + Paint |
Step 5: Find the critical path
If you add up the durations for all of your “essential” tasks and calculate the longest possible path, you can determine your critical path. In your calculation, only include the tasks that, if they go unfinished, will impact the project’s finish date. In this example, if the “non-essential” tasks—like landscaping and driveway pavement—are not completed, the house structure completion date will not be impacted.
You can also calculate the critical path using two common approaches: the forward pass and the backward pass. These techniques are useful if you are asked to identify the earliest and latest start dates (the earliest and latest dates on which you can begin working on a task) or the slack (the amount of time that task can be delayed past its earliest start date without delaying the project).
- The forward pass refers to when you start at the beginning of your project task list and add up the duration of the tasks on the critical path to the end of your project. When using this approach, start with the first task you have identified that needs to be completed before anything else can start.
- The backward pass is the opposite—start with the final task or milestone and move backwards through your schedule to determine the shortest path to completion. When there is a hard deadline, working backwards can help you determine which tasks are actually critical. You may be able to cut some tasks—or complete them later—in order to meet your deadline.
You can read more about each of these concepts and critical path calculation methods in the following articles:
Project budgeting best practices
Here are a few tips to consider when creating your project budget:
-
Reference historical data: Your project may be similar to a previous project your organization has worked on. It is important to review how that project’s budget was handled, find out what went well, and learn from any previous mistakes.
-
Utilize your team, mentors, or manager: Get into the habit of asking for your team to double check your work to give you additional sets of eyes on your documents.
-
Time-phase your budget: Time-phased budgeting allows you to allocate costs for project tasks over the projected timeline in which those expenses are planned to take place. By looking at your tasks against a timeline, you can track and compare planned versus actual costs over time and manage changes to your budget as necessary.
-
Check, check, and double check: Make sure that your budget is accurate and error-free. Your budget will likely require approval from another department, such as finance or senior management, so do your best to ensure that it is as straightforward to understand as possible and that all of your calculations are correct.
Categorize different types of costs
There are different types of costs that your project will incur. For example, you may need to account for both direct costs and indirect costs in your project budget. Categorize these different types of costs in your budget so that you can ensure you are meeting the requirements of your organization and customer.
Direct costs
These are costs for items that are necessary in order to complete your project. These costs can include:
-
Wages and salaries of employees and contractors
-
Materials costs
-
Equipment rental costs
-
Software licenses
-
Project-related travel and transportation costs
-
Staff training
Indirect costs
These are costs for items which do not directly lead to the completion of your project but are still essential for the project team to do their work. They are also referred to as overhead costs. These costs can include:
-
Administrative costs
-
Utilities
-
Insurance
-
General office equipment
-
Security
Develop a baseline budget
A baseline budget is an estimate of project costs that you start with at the beginning of your project. Once you have created a budget for your project and gotten it approved, you should publish this baseline and use it to compare against actual performance progress. This will give you insight into how your project budget is doing and allow you to make informed adjustments.
It is important to continually monitor your project budget and make changes if necessary. Be aware that budget updates can require the same approvals as your initial budget. Also, you should “re-baseline” your budget if you make significant changes. Re-baselining refers to when you update or modify a project’s baseline as a result of any approved change to the schedule, cost, or deliverable content. For example, if you have a significant change in your project scope, your budget will likely be impacted. In this instance, you would need to re-baseline in order to adhere to a realistic budget.
Perform a reserve analysis
A reserve analysis will help you account for any buffer funds you may need. First, review all potential risks to your project and determine if you need to add buffer funds, also referred to as a contingency budget. These funds are necessary because new costs that you did not expect are likely to happen throughout the project. You may also want to account for cost of quality in your overall project budget. The cost of quality refers to all of the costs that are incurred to deliver a quality product or service, which can extend beyond material resources. This includes addressing issues with products, processes, or tasks, along with internal and external failure costs. One example would be having to redesign a product or service due to defects. A defect could mean refunds to customers, time and money required to create a new product or service, and multiple other potential costs affecting the client.